Table of Contents:
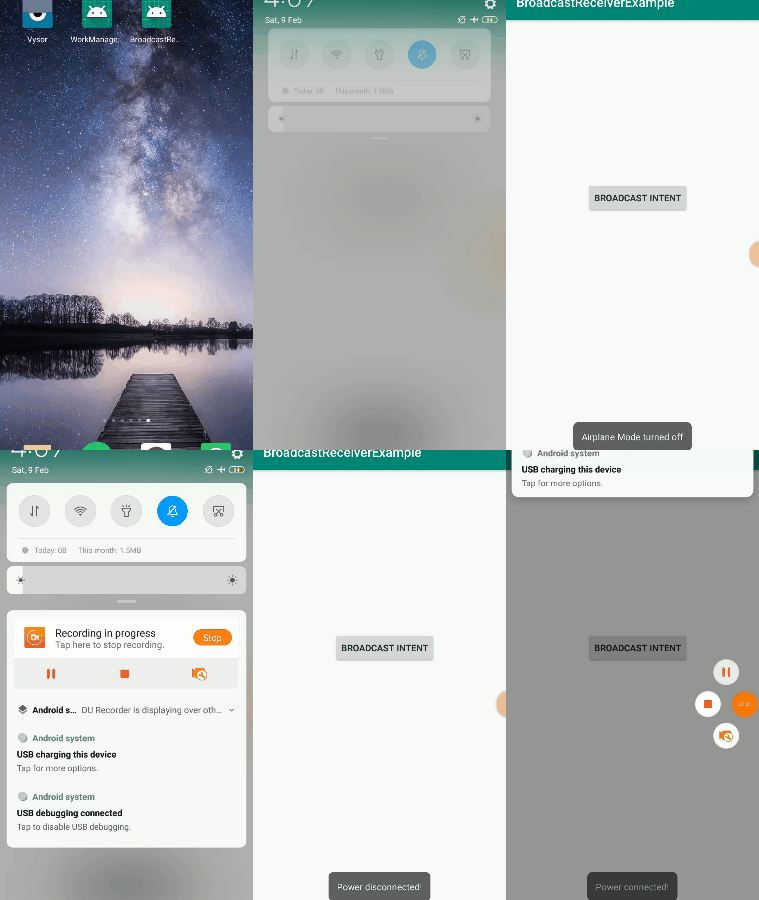
- Demo
- Introduction
- What is Broadcast Receiver?
-
An Example:
Demo

Introduction
In this blog I'm going to show you how to use a Broadcast Reciever in Android.
What is a Broadcast Receiver?
Broadcast Reciever : A Broadcast Reciever is one of the five components of Android. In simple language, on occurence of some system or application events such as Low Battery, Connection State change, etc. Android system sends a broadcast event to the application and based on that events, our application can responds to them.
Creating a custom Broadcast Receiver class
Create a new Java class "MyReceiver.java" which extends from BroadcastReceiver and override "onReceive()" method.If the event happens for which our Broadcast Receiver is registered then Android system will call this method , it takes two parameters context and Intent.
Registering a Broadcast Receiver
Open AndroidManifest.xml file and register your custom BroadcastReceiver class in receiver tag(All the components of Android must be registered in AndroidManifest.xml file).The following code should be included in application tag , exported = "false" means that the other applications can't use this Receiver.
Designing Layout
Open activity_main.xml file and add the following code . This layout contains button on click of which we will register our broadcast receiver.
Implementing Broadcast Receiver in Activity
Open MainActivity.java file and add the following code , we are creating objects of MyReceiver class , Button and IntentFilter(IntentFilter is used for filtering the intents based on some actions and category) outside of onCreate() and in onCreate() when button is clicked we are registering a receiver followed by onDestroy() in which we are unregistering a receiver.
Note: In this article I haven't added any custom actions in Intent filter yet,this is just a basic setup for the intent filter and broadcast receiver.
How the Intent filter works?
Intent filter contains all the "implicit intents" that the app can handle.Suppose an event occured in app then Android system looks for intent filter with that event and the components which can handle the event will be called.
Why we need to unregister a Broadcast Receiver in onDestroy()?
If we don't unregister a receiver in onDestroy() then it still holds the reference to activity , even if we close the activity this leads to Memory leaks(Memory which is allocated but never freed) in android and Garbage collector will not be able to free that unused memory.
Adding actions to Intent filter
We are adding some actions to Intent filter object so that when System receives the intents then it searches the receivers based on actions specified in Intent filter object.
- ACTION_POWER_DISCONNECTED : This action is called or you can say system sends an intent as broadcast every time when power supply got disconnected and then we can show a Toast notifying the user.This can be done in two steps :
- Open MainActivity.java and inside onCreate() add the following code.
- Open MyReceiver.java and inside onReceive() add the following code. In this code from intent object we are retreiving action and if action is equal to POWER_DISCONNECTED then we are displaying a toast notifying the user.
- Open MainActivity.java and inside onCreate() add the following code.
- ACTION_POWER_CONNECTED : This action is called or you can say system sends an intent as broadcast every time when power supply got connected and then we can show a Toast notifying the user.This can be done in two steps :
- Open MainActivity.java and inside onCreate() add the following code.
- Open MyReceiver.java and inside switch statement add the following code. We are adding another case for ACTION_POWER_CONNECTED and displaying a Toast message.
- Open MainActivity.java and inside onCreate() add the following code.
- ACTION_HEADSET_PLUG : This action is called or you can say system sends an intent as broadcast every time when headset got plugged in or plugged out and then we can show a Toast notifying the user.This can be done in two steps :
- Open MainActivity.java and inside onCreate() add the following code.
- Open MyReceiver.java and inside switch statement add the following code. We are adding another case for ACTION_HEADSET_PLUG and displaying a Toast message based on value of state.
- Open MainActivity.java and inside onCreate() add the following code.
- ACTION_BATTERY_LOW : This action is called or you can say system sends an intent as broadcast every time when battery is low and then we can show a Toast notifying the user.This can be done in two steps :
- Open MainActivity.java and inside onCreate() add the following code.
- Open MyReceiver.java and inside switch statement add the following code. We are adding another case for ACTION_BATTERY_LOW and displaying a Toast message.
- Open MainActivity.java and inside onCreate() add the following code.
- ACTION_BATTERY_OKAY : This action is called or you can say system sends an intent as broadcast every time when battery is okay this indicates that battery is now okay after being low and then we can show a Toast notifying the user.This can be done in two steps :
- Open MainActivity.java and inside onCreate() add the following code.
- Open MyReceiver.java and inside switch statement add the following code. We are adding another case for ACTION_BATTERY_LOW and displaying a Toast message.
- Open MainActivity.java and inside onCreate() add the following code.
- ACTION_AIRPLANE_MODE_CHANGED : This action is called or you can say system sends an intent as broadcast every time when user switched the phone into or out of Airplane Mode and then we can show a Toast notifying the user.This can be done in two steps :
- Open MainActivity.java and inside onCreate() add the following code.
- Open MyReceiver.java and inside switch statement add the following code. We are adding another case for ACTION_AIRPLANE_MODE_CHANGED and displaying a Toast message based on value of state.
- Open MainActivity.java and inside onCreate() add the following code.
That's All! Happy Coding!
The complete code is available here.
Staying in the Loop
If you want to stay in the loop and get an email when I write new blog posts, Follow me on Instagram or join the CodingWithMitch community on my website. It only takes about 30 seconds to register.
Authors

Create an Account
Similar Posts
CodingWithMitch Members
Unlimited access to all courses and videos
Step by step guides to build real projects
Video downloads for offline viewing
Members can vote on what kind of content they want to see
Access to a private chat with other communnity members & Mitch
CodingWithMitch Members
Unlimited access to all courses and videos
Step by step guides to build real projects
Video downloads for offline viewing
Members can vote on what kind of content they want to see
Access to a private chat with other communnity members & Mitch
Comments